No Copy


No Right Click

Selamat Datang di Situs Belajar PLC dan SCADA

Blog gratis yang menyajikan berita seputar PLC dan SCADA.

Microsoft Windows 10

Berita seputar Microsoft Windows 10. Membahas berbagai informasi mengenai Microsoft windows terbaru.

Apple OSX

Artikel yang membahas tentang OSX terbaru dari Apple tentu sangat menarik untuk dibaca. Tak kalah serunya jika kita paham mengenai tips dan trik yang ada didalamnya.

Photography

Photography asik dan menarik jika kita mengetahuinya lebih dalam. Disini kita bisa melihat berbagai hal dari sudut pandang photo. Menarik untuk dipahami.

Showing posts with label Rockwell PLC. Show all posts

Saturday, August 29, 2015

What can a PLC do? Why do we use them?

The meaning of PLC…

“PLC” means “Programmable Logic Controller”, that’s clear. The word “Programmable” differentiates it from the conventional hard-wired relay logic. It can be easily programmed or changed as per the application’s requirement. The PLC also surpassed the hazard of changing the wiring.
The PLC as a unit consists of a processor to execute the control action on the field data provided by input and output modules. In a programming device, the PLC control logic is first developed and then transferred to the PLC.
So, what can a PLC actually do?
  1. It can perform relay-switching tasks.
  2. It can conduct counting, calculation and comparison of analog process values.
  3. It offers flexibility to modify the control logic, whenever required, in the shortest time.
  4. It responds to the changes in process parameters within fractions of seconds.
  5. It improves the overall control system reliability.
  6. It is cost effective for controlling complex systems.
  7. It trouble-shoots more simply and more quickly
  8. It can be worked with the help of the HMI (Human-Machine Interface) computer
There are many other things this little ‘mean’ thing can do, but one thing I’m sure – that PLCs are irreplaceable in many industry applications and control projects.
Here is an example of wired ABB’s AC500 programmable logic controllers.
Wired ABB's PLCs
Figure 1 – Wired ABB’s PLCs (photo credit: us.profinet.com)

Basic block diagram

Figure 1 shows the basic block diagram of a common PLC system.
Block diagram of a PLC
Figure 2 – Block diagram of a PLC

As shown in the above figure, the heart of the “PLC” in the center, i.e., the Processor or CPU (Central Processing Unit).
  • The CPU regulates the PLC program, data storage, and data exchange with I//O modules.
  • Input and output modules are the media for data exchange between field devices and CPU. It tells CPU the exact status of field devices and also acts as a tool to control them.
  • A programming device is a computer loaded with programming software, which allows a user to create, transfer and make changes in the PLC software.
  • Memory provides the storage media for the PLC program as well as for different data.

Size of the PLC system

Usually they are classified on the basis of their size:
  • A small system is one with less than 500 analog and digital I/Os.
  • A medium system has I/Os ranging from 500 to 5,000.
  • A system with over 5,000 I/Os are considered large.

Components of the PLC system

CPU or processor: The main processor (Central Processing Unit or CPU) is a microprocessor-based system that executes the control program after reading the status of field inputs and then sends commands to field outputs.
I/O section: I/O modules act as “Real Data Interface” between field and CPU. The PLC knows the real status of field devices, and controls the field devices by means of the relevant I/O cards.
Programming device: A CPU card can be connected with a programming device through a communication link via a programming port on the CPU.
Operating station: An operating station is commonly used to provide an “Operating Window” to the process. It is usually a separate device (generally a PC), loaded with HMI (Human Machine Software).

PLC Configurations

There are two basic configurations that commercial manufacturers offer:
1. Fixed Configuration
Fixed PLC configuration

2. Modular Configuration
Modular type PLC 'SLC 500'
Modular type PLC ‘SLC 500’ (photo credit: ab.rockwellautomation.com)

PLC Applications (VIDEOs) //

Real world applications


An Application for Industrial Process Control


PLC Bottling Application

PLC application color mixing


PLC Suited To Bottling Line Application

5 guides to study PLCs //

  1. PLC – Programmable Logic Controller – Hugh Jack
  2. PLC Programming – OMRON
  3. PLC – Theory and Implementation – L.A. Bryan; E.A. Bryan
  4. Industrial Training – SCADA System and PLC – Mr. Sonu Kumar Yadav

References //
  • Industrial Automation Pocket Book – IDC Technologies
  • Overview of Programmable Overview of Programmable Logic Controllers – Dr. Fernando Rios-Gutierrez

Thursday, April 23, 2015

PLC Analog IO Troubleshooting Tips

When commissioning or troubleshooting PLC inputs and outputs (IO), the analog signals are often the most difficult.  First, analog IO almost always has to be scaled to convert the raw signal to useful process values.  Also, there are many wiring and external device (sensor/actuator) configurations.
Here are some simple guidelines for troubleshooting and working with Analog IO.  Although these guidelines are intended to help you think about the process of troubleshooting, this process will surely catch any specific issues you encounter.

Inside the PLC:
1. Ensure the IO channels are properly configured
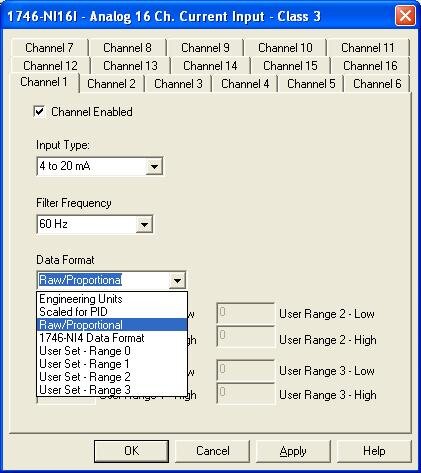
Most PLCs try to make it easy to configure analog IO hardware.  There are often selection boxes for the many signal types:  Voltage / current / resistance.   4 wire / 2 wire.  In the Allen Bradley RSLogix500 IO configuration at #3 below, for example, you can select an input type for each channel.
Double-check your analog IO channel settings and make sure they match the sensor or actuator wired to that channel.  As described in step 2 above, these may be configurable settings, or they may be fixed values.  Either way, they must match your PLC configuration.
2. Make sure the raw values are within range
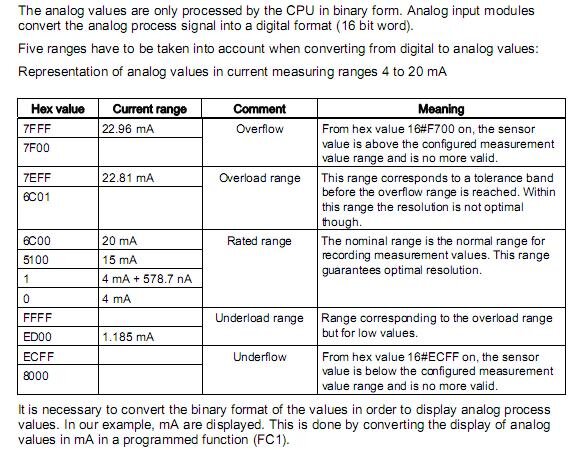
All analog IO modules have defined ranges for raw IO values.  For example, the Siemens SM331 analog module manual has the following range definitions listed for a 4-20mA input:
 
Most PLCs have a way to monitor the raw input values.  For the Siemens example above, if you see that the raw hex input value is outside the rated range, then there is a problem with the analog signal to the PLC, and thus the problem lies with the wiring or the sensor itself.

3. Check PLC scaling
Analog input and output scaling can occur both at the IO module configuration and inside the PLC logic program.  Check both locations to make sure the PLC value is not accidentally being scaled twice.  We generally recommend scaling within the PLC program instead of in the IO module configuration so the math is obvious and visible at one location.
In the Allen Bradley RSLogix500 IO configuration below, for example, you can select between the different data formats, which include automatic or user-defined scaling.

Outside the PLC:
1. Check all wiring connections
Ok, this may seem obvious, but it's still the best place to start.  Wiring mistakes are known to happen from time to time, especially on new systems.  Wires are also known to become loose after years of faithful servivce.
Consult manuals for both the analog IO module and analog device.  Most, if not all, will have installation wiring diagrams.  Many analog wiring mistakes are related to improper grounding, so watch for that specifically. 
2. Check sensor / actuator settings
Many analog devices such as sensors or actuators require configuration.  For example, an ultrisonic sensor has a "teach" mode that defines the conditions for the minimum 4mA and maximum 20mA signals (assuming it is a 4-20mA sensor).  Other devices, such as a temperature transmitter, may require you to configure it for voltage or current mode.
At the very least, you will need to confirm the scaling and range for any analog device so that the PLC and the device are "speaking the same language" so to speak.  These ranges and scales can be found in a manual or the device itself.
3. Measure the analog signal with a multimeter
If you've checked out the wiring and the settings and still have trouble with your analog device, pull out a multimeter and measure the actual voltage or current signal going to or from the device.  This will remove any ambiguity about what the signal "should" be and tell you exactly what it is an whether it's a device issue or a PLC issue.

Source Code Protection in Studio 5000 Logix Designer

While working with a customer on a recent RSLogix 5000 project (now called Studio 5000), there was a need to protect some proprietary source code. In this particular case, DMC had developed a custom Add-On Instruction (AOI) to be used within the project that contained some unique logic that the client wished to protect. This is incredibly easy to do. Rockwell provides an easy tool for this that comes prepackaged with RSLogix. 
Since protecting intellectual property or touchy algorithms while opening up some of the code for modification or troubleshooting is pretty common, I thought I'd share some of the info I found and provide a few easy steps to locking down your code. Incidentally, while I'll walk you through configuring an AOI for source protection, you can use the same approach to protect routines as well.
Note that all of the information below can be found in various forms in two useful documents published by Rockwell Automation that I would highly recommend you download for reference:
Enabling Source Protection
Out of the box, source code protection is not enabled in RSLogix 5000. So if you have never used it, chances are good that its never been activated. To check, open up the project you are working on and look under Tools >> Security. If you don't see an option for "Configure Source Protection," then you will need to enable it.
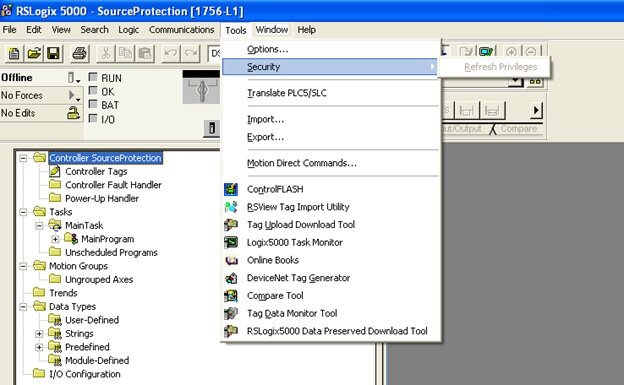
I would assume that you really only need to make a quick registry change, but its even easier than that as Rockwell provides a free tool you can download and run to take care of it for you. Allen Bradley provides some good instructions for the process that outline the different methods for different revs of RSLogix in Logix5000 Controllers Security. In my case, using rev 20, I needed to download Allen Bradley's Source Protection Tool. To find it, I started at their software download page and searched RSLogix Downloads. You should see it listed as "RSLogix 5000 Source Protection Tool." This is a quick download. After running, restart RSLogix and you should see a new option under Tools >> Security: Configure Source Protection.
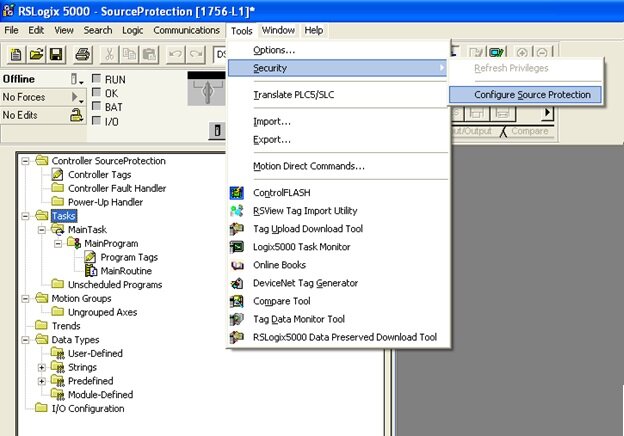
Ok, after enabling, you can choose your newly available option and you will now be prompted to specify a Source Key File location. Go ahead and choose a location. If you don't have a source key file in the specified directory, you will be asked if you would like to create one. This source key file will contain your keys for any protection you establish. This file can be moved from computer to computer, or it can be built locally by adding the keys you create. Go ahead and create a new one; once you've done so, you're ready to lock down your code.

Protecting an AOI
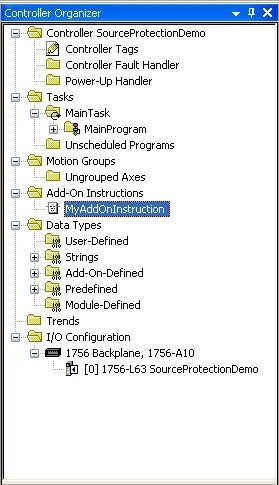
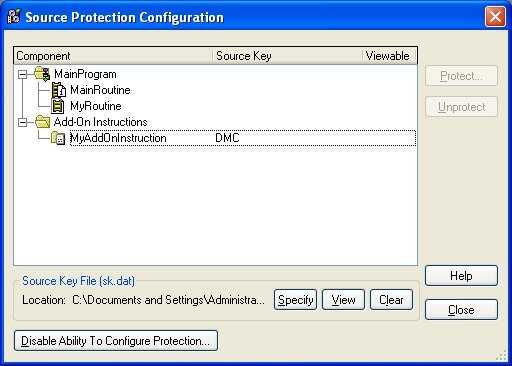
For a quick demo, I created a new project with a single Routine called 'MyRoutine' and a single AOI, 'MyAddOnInstruction.' Once you open up Source Protection Configuration from Tools >> Security, you will see that your programs and Add-On Instructions will be available. You can configure different keys and settings for each program and AOI, but lets just walk through configuration of 'MyAddOnInstruction.' Take a look and notice that there are currently no Source Keys defined.
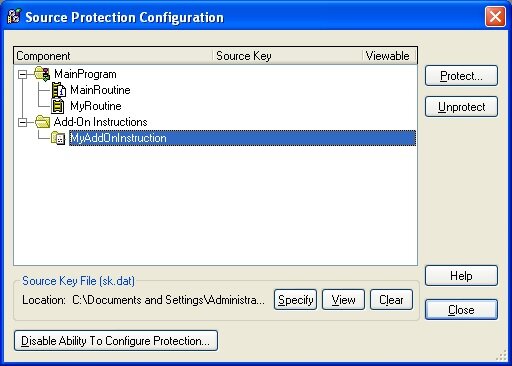
 

Select your AOI you would like to protect and choose "Protect." A Source Key dialog will open allowing you to select or create a source key to apply to your selected component (in this case, our AOI). I'm going to create a new one, "MyKey" and name it DMC. If you choose not to show the key (characters will not be shown on the screen) you will need to confirm the key a second time. I prefer to just see what I'm typing. You can also define a Source Key Name. This is really just a friendly name to associate with your key (think of user name::password, key name::key) that will be shown in the Source Protection Dialog to protect your key from prying eyes.
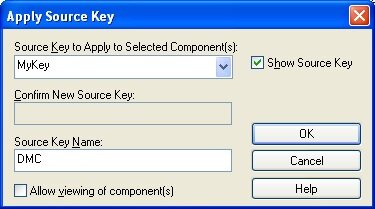
 

The checkbox in this dialog is worth discussing in a little more detail. You have two choices for the level of protection you are enabling. Leaving this checkbox unchecked will completely lock and hide the code source code from anyone without the key. Any one viewing the project (or any project containing this AOI) without the key will not be able to view, access, or edit the source code for the instruction. Selecting the checkbox will allow a user to view, but not to modify the source code, in effect making it read only. Of course with either selection, if you have the key, you have full access.
It should be noted that in addition to protecting any sensitive code, this can also be used as a method of source or version control and can be a great way to prevent unauthorized or unintended edits to sections of source code that have been validated or released.
Getting back to our walkthrough, let's go ahead and leave the checkbox unchecked and select OK. This will bring us back to the Source Protection Configuration dialog again, but you will now see that the key "DMC" has been added to our AOI and it is not selected as viewable for anyone without the key.

We're done here. Choose "Close" to exit the dialog and take a look at your project tree. You shouldn't notice any changes. You can still expand and see both Tags and Logic for the AOI we just protected. However, to see what it looks like to someone without the key, I'm going to save the project, exit RSLogix, and delete my key file. Now, after reopening the project we can see that I am not able to expand the AOI - there is no access to the Tags or Logic for the instruction.
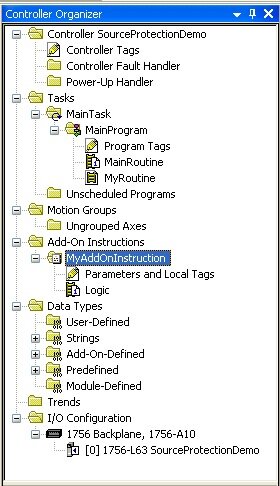
       

If we dig a little deeper and open up the Source Protection Configuration dialog again, we will see that 'MyAddOnInstruction' is protected and has an unknown source key. Selecting the AOI and choosing "Protect" will bring us back to the Apply Source Key dialog. Attempting to apply a new source key other than the one we already created for this instruction will give an error and will not allow us to unlock it. However, I luckily grabbed a screenshot of the earlier showing me that I used the key 'MyKey.' Sure enough, entering this key will unlock the AOI and allow access to the source code again.
It is also worth taking the time here to export our AOI. Normally, an exported AOI will be saved in human readable text in an XML type format (try it!). However, when source protection has been enabled, this exported file is encrypted.
Before I wrap this up, I want to get back to one more point. I touched upon this earlier, but its worth mentioning that there are many reasons one may want to use Source Protection within their project. In addition to protecting proprietary code, it can also be a useful method of source control. A good example may be a custom motor implementation in a large project. Once development and testing has been completed on the instruction or routine, the code could be locked by the creator to prevent any accidental changes by others. By locking and then exporting to a library, other developers can then use the instruction and be guaranteed that the source code has not been modified.
This, combined with the version information available for each AOI and routine, can be a great way to manage a shared library of reusable code. DMC strives to make code as reusable as possible as a means to decrease development time (and cost), increase reliability, and provide for scalability and modularity. Combining this with versioning software such as SVN provides for an easy way to maintain a library for all our engineers to share.
Finally, a quick disclaimer about security. I personally haven’t delved into how encrypted or hidden this method of source code protection is, but it will probably serve for the majority of purposes. In the case of extremely valuable intellectual property, I would always strongly recommend consulting with experts before trusting that this is bullet proof. DMC has acquired a wealth of experience in the past few years protecting valuable information and has the experts available should this be the case.

Siemens vs Allen-Bradley: Function Blocks

iemens and Rockwell Automation are two giants competing in industrial automation technology today.  Rockwell (aka Allen-Bradley) seems to be more popular in the US market, but Siemens has a larger international customer base.  A cursory Google search will reveal that there is no lack of debate among automation professionals over which one is preferred.
On the higher end of their PLC lines, the programming environments to use are:
  •   Siemens - Step 7 Simatic Manager for S7-300 and 400 level PLCs
  •   Allen-Bradley (AB) - RSLogix 5000 for the Control Logix and Compact Logix PLCs 
As someone who uses both platforms regularly, I would like to compare one of the key differences between them - function blocks.

What's a function block?

Siemens uses the term Function Block (FB) for program routines that can have internal memory, as opposed to Function Calls (FC) that have only temporary internal memory.  Function blocks are a fundamental concept in the Siemens platform, which give them a significant advantage for large, modular applications.
In AB’s RSLogix 5000 version 16 and higher, reusable function blocks are called Add-On Instructions (AOI) and can be defined with interface parameters and local tags.  Since this feature was only added in 2007, it is often overlooked and doesn’t fit as seamlessly into the overall environment.
Why use function blocks, you ask?  You must read the DMC blog: "IEC 61131-3 Function Blocks - Unleash the Power!"
It is worth mentioning that both platforms adhere to the IEC-61131-3 standard, which means that function blocks are available and can be written in any of the standard's languages.

Interfacing to an instance of a function block

The way you interface to a function block is critical for program efficiency, readability, and development time.  The point of a reusable function block is to wrap up complex or repetitive code and make a simple and easy to use interface in order to use that code.  For example, when I visit a fast food drive-thru, I don’t need to tell them how to make a burger.  They have made billions before mine.  I just want to give my order, watch my burger come out the window, and then be on my way.
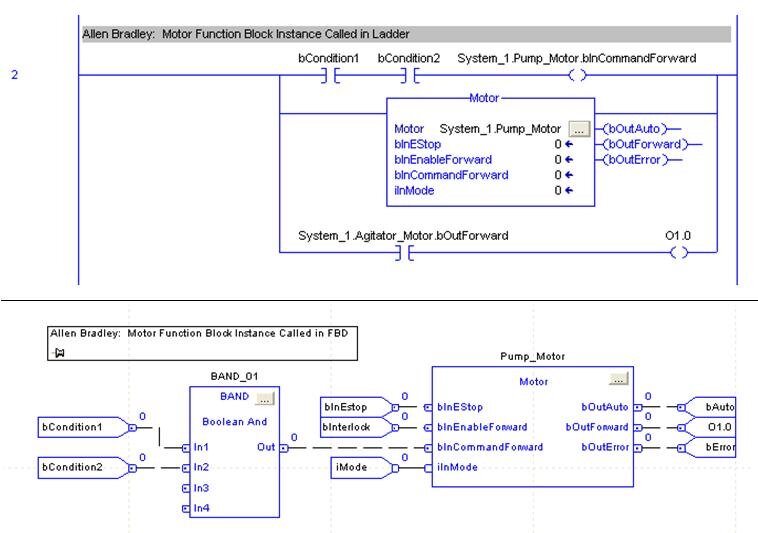
In AB:  Parameters in ladder have to be referenced independently from the function block call
If the function block instance is called in ladder, the input parameters can only be assigned with the block call if they are constants.  Variable inputs must be assigned to input parameters in preceding ladder rungs.  Outputs must be referenced in ladder rungs following the function block call.  If calling the function block instance in FBD (function block diagram), then variables can be directly assigned to input and output parameters.
Disadvantage:  More rungs of ladder to maintain.  If called in FBD instead, then there are restrictions on instance declaration (see below) and simple Boolean logic is more complicated because you must use the FBD function boxes instead of contacts and coils.

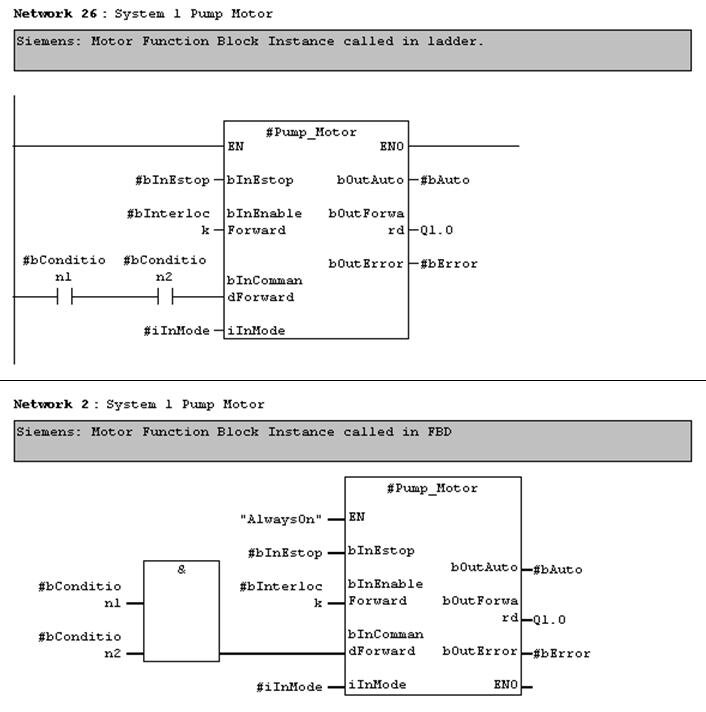
In Siemens:  Parameters are directly interfaced in both ladder and FBD
Function block instances that are called in ladder and FBD are essentially the same.  Even in ladder, variables can be assigned directly to input parameters.  Boolean input parameters can also be assigned to the result of ladder logic operations.  Function block outputs can be assigned directly to variables in the same rung of ladder.
Note that function block input and output parameters can also be accessed symbolically from other rungs in ladder logic (just like the AB example above), but Siemens has the additional advantage of directly assigning input and output parameters in the same rung as the function block call.
Advantage:  All input and output parameter assignment for a function block instance can be consolidated in one rung and not spread out on separate rungs or throughout the program.

Declaring an instance of a function block

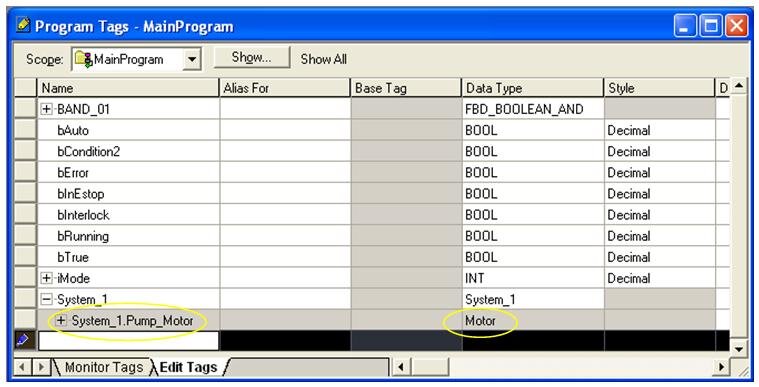
In AB:  Limited to program tag file.  If using FBD, cannot reside in a UDT
Instances of AOIs are most commonly declared in the “Program Tags” file of a program folder.   Even for very modular programs, all function blocks are listed in this one common location.  Instances can be declared within UDTs (user-defined types), but not if you want to use them in the FBD environment.
Advantage:  Simplicity.  One location to look through for each program folder.

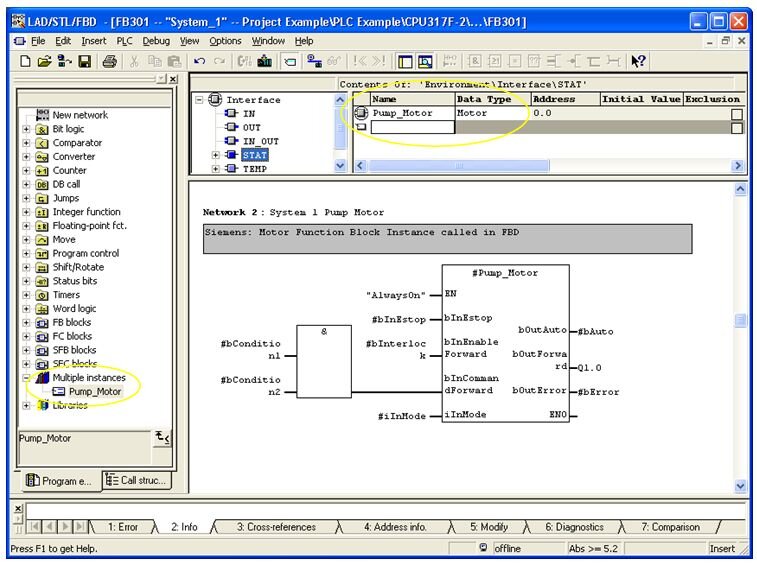
In Siemens:  Memory resides in an instance data block, but is declared within parent function blocks.
Most program logic, not just reusable logic, is located within function blocks.  “Parent” function blocks are assigned an instance data block.  All reusable function block instances can be declared within the parent function block’s static memory.
Advantage:  Modularity.  Instances are declared within the function block that they are called.

Summary 

In summary, Siemens seems to offer a little more flexibility in how function blocks are interfaced and instantiated.  We have seen, however, that both Allen Bradley and Siemens offer solutions for reusable function blocks on their higher-end PLCs.  Both Function Blocks in Siemens and Add-On Instructions in Allen Bradley will enhance the modularity and maintainability of your PLC program.  

Sunday, March 15, 2015

Tutorial for Allen Bradley PLC (Tutorial Gratis Rockwell PLC)

Silahkan di pelajari dan disimak Video di bawah ini (Bagian 1 dan 2).


Programmable Logic Controller Basics


Basic tutorial tentang PLC silahkan disimak dalam video di bawah ini:


Thursday, September 19, 2013

PLC Training / Tutorial for Allen-Bradley (Video 1 of 11)


 Video 1/11

Other Video from http://www.plcprofessor.com 

These proven plc training techniques distinguish Ron Beaufort's Training from most other courses.
Find the rest of the series here:
http://www.youtube.com/watch?v=jhLIOM...
Learn to be an effective troubleshooter, by teaching you to think the same way PLCs do.

These subjects are typically covered in the first few hours of the 40 hour long PLC Boot Camp course. The class room teaching is done with challenging hands-on exercises that ensure you retain what you learn.

These videos focus on the PLC-5, SLC-500, and Micrologix series. There are also PLC Boot Camp classes for the ControlLogix platform.

See this channel for the rest of this series:
http://www.youtube.com/RonBeaufort

Visit : http://www.ronbeaufort.com for more lessons online

Tuesday, May 29, 2012

FactoryTalk Activation Manager - Cara mudah aktivasi lisensi untuk Rockwell PLC Software

Sudah pernahkah anda menggunakan FactoryTalk Activation Manager dari Rockwell? 

Sebelum menjalankan aktivasi lisensi ini, pastikan anda terhubung dengan jaringan internet. dan Process ini hanya berlaku untuk aktivasi serial number resmi "BUKAN BAJAKAN/BUKAN COPY".

System requirements

In general, FactoryTalk Activation is designed to work within the system requirements of all Rockwell Automation software products. FactoryTalk® Activation is compatible with the 32-bit and 64-bit versions of the following operating systems:

  • Windows® 7
  • Windows Vista SP2, Business and Home editions
  • Windows XP SP SP3
  • Windows Server 2008 SP2
  • Windows 2003 Server SP2
  • Windows Server 2003 R2 SP2
  • Windows 2008 R2 Server (64 bit)

Activations may be installed on compressed drives and RAID arrays.

Unsupported operating systems


The following operating systems are no longer supported:
Windows 2000
  • Windows 9x
  • Windows NT 4.0

Berikut ini cara singkat dan mudah jika anda mempunyai Lisensi Software RSLogix5000 atau FactoryView.

Jalankan Software FactoryTalk Activation Manager melalui Start > Programs >> Rockwell Software >> FactoryTalk Activation >> FactoryTalk Activation Manager. Kemudian akan muncul windows seperti dibawah ini.


Kemudian setelah muncul windows seperti diatas, klik tombol Get New Activation, setelah itu ikut langkah yang diberikan, masukan serial number software rockwell, kemudian klik tab Manage Activation. Setelah itu akan muncul tampilan windows seperti dibawah ini.


Klik Get New Activations dan secara otomatis software ini akan terkonek dengan server Rockwell.
Jika anda berhasil mengaktivasi lisensi ini.. sebuah tampilan kolom yang merincikan apa yang anda aktivasi akan muncul.

Jika anda ingin mengetahui status server aktivasi... silahkan klik tab Advanced...


Selamat mencoba dan Say no to Copy... No Bajakan.. No Pirates....

Saturday, December 10, 2011

How to scale analog inputs and outputs – PLC scaling examples

scaling analog value

Analog I/O whether it is 4-20mA or 0-10 V are connected to pressure transducers, level probes and other analog devices. As PLC programmer or control engineer you will need to get some knowledge about scaling analog signals from plc I/O modules. Scaling helps to convert analog value to measure units ( pressure, level etc.).
Most industrial applications usually require measurements in engineering units, which provide more meaningful data. We can achive this by using the conversion formula shown: Example by AutomationEngineering.
scale calculation
Time for example
If we want to measure level in tank from 0 to 65 meters then our L = 0, H = 65 max value from our analog card 32000 ( in engineering units ). Current value A from analog input is 13454. Now if we calculate it using our equation we will get current level of 23.7 meters.

Now situation looks slightly different with Analog Output.
Your PLC program has to calculate the digital value to send to the analog I/O module. There are many ways to do this, but most industrial applications are understood more easily if you use measurements in engineering units. We can do this by using the conversion formula shown.
analog output calculation

Consider the following example with level measurement
We know there is 38 meters of liquid in tank. Our H = 65m L=0m. Max analog output value is 32000. If we use our calculation we will get 18707 which we are going to send to our Analog Output.
Many Programmable Logic Controllers have ready to use instruction for scaling.
S7-200 Siemens PLC scaling the analog input in the output data format REAL (S_ITR)
The S_ITR function permits you to convert the analog input signal into a normalized value between 0.0 and 1.0 (type REAL)
The following table explains the abbreviations used:
ParameterDescription
OvScaled output value (Output value)
IvAnalog input value (Input value)
OshUpper scale limit for the scaled output value (Output scale high)
OslLower scale limit for the scaled output value (Output scale low)
IshUpper scale limit for the scaled input value (Input scale high)
IslLower scale limit for the scaled input value (Input scale low)
our instruction
Simatic S7-200 scale

How to save Memory and Optimize Performance of a Logix Controller

How to get maximum performance from your control system?

It is important to think ahead before designing and configuring your control system. Decisions you make during the design phase of your project can directly impact system
performance. In the controller alone, there are several design considerations and guidelines that can help you improve controller performance, conserve memory space and minimize execution time for moving and accessing data. Rockwell Software has a tool called Integrated Architecture.RSLogix 5000
Consider the following tips to help save memory and optimize performance of a Logix controller:
Choose a programming language best suited for the task you’re trying to accomplish with Allen Bradley RSLogix 5000.

Rockwell software® RSLogix™ 5000 programming software supports the IEC 61131-3 compliant programming language you need to solve your discrete, process, batch, drive, safety and motion control challenges. Language editors for relay ladder logic (RLL), function block diagram (FBD), sequential function chart (SFC) and structured text (ST) programming are native to RSLogix 5000 programming software as well as ControlLogix® programmable automation controllers (PACs), CompactLogix™ PACs, softLogix™ controllers, and Powerflex® 700s drives with DriveLogix™ controllers.
Each routine in RSLogix 5000 programming software contains logic in one programming language. Choosing a programming language most suitable for the task you’re trying to accomplish will not only help reduce program complexity and troubleshooting/maintenance costs, but it also helps make the code more readable, improves the development process and improves the performance of the controller.

For example, you could use Ladder Logic for complex data handling, such as sorting algorithms. This process would work, but take weeks (and potentially hundreds of rungs of code) to program. This would be time-consuming to write and maintain, less readablemand require extra time in the controller to scan and execute.
 Using structured text for this task is more suitable, making programming a complex, bubble-sorting algorithm simple, straightforward and more efficient: 10 lines of code with less impact on controller performance.
 This is just one example of choosing the right programming language for the right task. Mixing and matching programming languages in your project to meet an application need is a key competency of  RSLogix 5000 programming software. In the same project, you can program a batch operation in Sequential Function Chart, pump station in Function Block Diagram, conveyor system in Ladder Logic and a complex mathematical algorithm in Structured Text. Making the right programming language selection for solving a task can help reduce maintenance costs, improve code readability, save memory space and improve the performance of the controller.

Use a 32-bit data type for maximum efficiency. An important factor to consider when designing your control architecture is data organization and performance. the control engine in Logix PACs is based on a 32-bit boundary, so performance and memory use are optimized by using 32-bit data types. If you use non-32-bit data types with 32-bit
CPus, each instruction can take up unnecessary memory space, and multiplied by thousands of instructions, this can quickly consume available memory. This is especially crucial to consider for smaller controllers with limited memory.
For example, using double integer (DINT) data types instead of integer (INT) data types helps reduce execution time and memory usage.
Executing a simple ADD instruction with INT data types, such as:
INT + INT = INT takes 260 bytes of memory and 3.49 μsec to execute.
If the same ADD instruction is executed with DINt data types:
DINT + DINT = DINT takes 28 bytes of memory and .26 μsec to execute.
the reason for this major difference in memory use and execution time is that the controller converts each INT to a DINT before it adds them together, and then has to convert the sum back to an INT. It takes additional execution time and memory to store the INT.

Optimize With Arrays and User-Defined Structures (UDTs)

The method used to create tags in the controller directly impacts performance in terms of execution time for accessing data. Creating individual tags in your program results in the creation of scattered tags in the memory of the controller. Scattered tags must have pointer data associated with them, which requires more time when trying to access the tags. Instead, create tags in arrays or user-defined structures in the tag database.
An array allocates a contiguous block of memory to store a specific data type as a table of values. Consolidating tags into arrays and structures helps reduce the communication overhead needed to access data in the controller (up to six times the amount of memory in the controller). Tags support arrays in one, two or three dimensions and user-defined structures (UDTs) can contain members that are single-dimensional arrays.
User-defined structures allow you to combine multiple data types (atomic, predefined structures or user defined structures) into a new data type. Organization of the members of userdefined structures can greatly influence memory use, layout and performance.All elements in UDTs are located on a byte (8 bit) boundary. Grouping like elements together when creating a UDT will help conserve memory, and reduce communication and execution time when accessing data. In the example here, notice that a
simple change such as grouping like data types (BOOLs) saves four bytes of memory. This is a simple example, but UDTs in RS Logix 5000 programming software can have as many as 500 members and take up 2MB of controller memory.
Following some basic guidelines when organizing and designing your UDT will save on memory allocation and improve performance in the controller.
For more design recommendations, please review the Rockwell Software RS Logix™ 5000 Design Considerations Manual (1756-RM094C-EN-P) from the Web site below:
http://literature.rockwellautomation.com/idc/groups/literature/documents/rm/1756-rm094_-en-p.pdf
#