No Copy


No Right Click

Selamat Datang di Situs Belajar PLC dan SCADA

Blog gratis yang menyajikan berita seputar PLC dan SCADA.

Microsoft Windows 10

Berita seputar Microsoft Windows 10. Membahas berbagai informasi mengenai Microsoft windows terbaru.

Apple OSX

Artikel yang membahas tentang OSX terbaru dari Apple tentu sangat menarik untuk dibaca. Tak kalah serunya jika kita paham mengenai tips dan trik yang ada didalamnya.

Photography

Photography asik dan menarik jika kita mengetahuinya lebih dalam. Disini kita bisa melihat berbagai hal dari sudut pandang photo. Menarik untuk dipahami.

Saturday, August 29, 2015

Comparison of Soft Starting and Frequency Converter Motor Starting

Soft starting

A soft starter is, as you would expect, a device which ensures a soft starting of a motor.
A soft starter has different characteristics to the other starting methods. It has thyristors in the main circuit, and the motor voltage is regulated with a printed circuit board. The soft starter makes use of the fact that when the motor voltage is low during start, the starting current and starting torque is also low.
Motor soft starter
Motor soft starter

Advantages //

Soft starters are based on semiconductors. Via a power circuit and a control circuit, these semi-conductors reduce the initial motor voltage.
This results in lower motor torque.
During the starting process, the soft starter gradually increases the motor voltage, thereby allowing the motor to accelerate the load to rated speed without causing high torque or current peaks.
Soft-starting curve - Synchronous speed - Full load torque (left) and Full load current (right)
Soft-starting curve – Synchronous speed – Full load torque (left) and Full load current (right)

Soft starters can also be used to control how processes are stopped. Soft starters are less expensive than frequency converters.
Another feature of the soft starter is the soft stop function, which is very useful when stopping pumps where the problem is water hammering in the pipe system at direct stop as for star-delta starter and direct-on-line starter.

Drawbacks //

They do, however, share the same problem as frequency converters: they may inject harmonic currents into the system, and this can disrupt other processes. 
Voltage ramp for soft starter. Run-up time is around 1 sec.

The starting method also supplies a reduced voltage to the motor during start-up.
The soft starter starts up the motor at reduced voltage, and the voltage is then ramped up to its full value. The voltage is reduced in the soft starter via phase angle. In connection with this starting method current pulses will not occur. Run-up time and locked-rotor current (starting current) can be set.

Electric Motor Soft Start 60HP (VIDEO)

Part 1


Part 2


Frequency converter starting

Frequency converters are designed for continuous feeding of motors, but they can also be used for start-up only.
The frequency converter is sometimes also called VSD (Variable Speed Drive), VFD (Variable Frequency Drive) or simply Drives, which is probably the most common name.
The drive consists primarily of two parts, one which converts AC (50 or 60 Hz) to DC and the second part which converts the DC back to AC, but now with a variable frequency of 0-250 Hz. As the speed of the motor depends on the frequency this makes it possible to control the speed of the motor by changing the output frequency from the drive and this is a big advantage if there is a need for speed regulation during a continuous run.
As stated above, in many applications a drive is still only used for starting and stopping the motor, despite the fact that there is no need for speed regulation during a normal run. Of course this will create a need for much more expensive starting equipment than necessary.
By controlling the frequency, the rated motor torque is available at a low speed and the starting current is low, between 0.5 and 1.0 times the rated motor current, maximum 1.5 x In.
Another available feature is softstop, which is very useful, for example when stopping pumps where the problem is water hammering in the pipe systems at direct stop. The softstop function is also useful when stopping conveyor belts from transporting fragile material that can be damaged when the belts stop too quickly.
It is very common to install a filter together with the drive in order to reduce the levels of emission and harmonics generated.
Frequency converter and its line diagram

Advantages //

The frequency converter makes it possible to use low starting current because the motor can produce rated torque at rated current from zero to full speed. Frequency converters are becoming cheaper all the time.
As a result, they are increasingly being used in applications where soft starters would previously have been used.
Frequency converter curve – Synchronous speed – Full load torque (left) and Full load current (right)

Drawbacks //

Even so, frequency converters are still more expensive than soft starters in most cases; and like soft starters, they also inject harmonic currents into the network.

What is a drive? (VIDEO)


VLT drives in large desalination plant (VIDEO)


VLT drives control cooling tower fans (VIDEO)


References //

PLC Implementation Of Forward/Reverse Motor Circuit With Interlocking

Forward/Reverse Motor Interlocking

Figure 1 illustrates a hardwired forward/reverse motor circuit with electrical and push buttoninterlockings. Figure 2 shows the simplified wiring diagram for this motor. The PLC implementation of this circuit should include the use of the overload contacts to monitor the occurrence of an overload condition.
The auxiliary starter contacts (M1 and M2) are not required in the PLC program because the sealing circuits can be programmed using the internal contacts from the motor outputs.
Hardwired forward/reverse motor circuit
Figure 1 – Hardwired forward/reverse motor circuit

Low-voltage protection can be implemented using the overload contact input so that, if an overload occurs, the motor circuit will turn off. However, after the overload condition passes, the operator must push the forward or reverse push button again to restart the motor.
Forward/reverse motor wiring diagram
Figure 2 – Forward/reverse motor wiring diagram

For simplicity, the PLC implementation of the circuit in Figure 1 includes all of the elements in the hardwired diagram, even though the additional starter contacts (normally closed R and F in the hardwired circuit) are not required, since the push button interlocking accomplishes the same task.
In the hardwired circuit, this redundant interlock is performed as a backup interlocking procedure.
Real inputs and outputs to the PLC
Figure 3 – Real inputs and outputs to the PLC

Figure 3 shows the field devices that will be connected to the PLC. The stop push button has address 000, while the normally open sides of the forward and reverse push buttons have addresses 001 and 002, respectively. The overload contacts are connected to the input module at address 003.
The output devices – the forward and reverse starters and their respective interlocking auxiliary contacts – have addresses 030 and 032. The forward and reverse pilot light indicators have address 031 and 033, respectively.
Additionally, the overload light indicators have addresses 034 and 035, indicating that the overload condition occurred during either forward or reverse motor operation. The addresses for the auxiliary contact interlocking using the R and F contacts are the output addresses of the forward and reverse starters (030 and 032). The ladder circuit that latches the overload condition (forward or reverse) must be programmed before the circuits that drive the forward and reverse starters as we will explain shortly. Otherwise, the PLC program will never recognize the overload signal because the starter will be turned off in the circuit during the same scan when the overload occurs.
If the latching circuit is after the motor starter circuit, the latch will never occurbecause the starter contacts will be open and continuity will not exist.
Table 1 shows the real I/O address assignment for this circuit. Figure 4 shows the PLC implementation, which follows the same logic as the hardwired circuit and adds additional overload contact interlockings.

Table 1 – I/O address assignment

I/O Address
Module TypeRackGroupTerminalDescription
 Input000Stop PB (wired NC)
001Fowrward PB (wired NO)
002Reverse PB (wired NO)
003Overload contacts
 Input004Acknowledge OL/Reset PB
–––
–––
–––
 Output030Motor starter M1 (FWD)
031Forward PL1
032Motor starter M2 (REV)
033Reverse PL2
 Output034Overload condition FWD
035Overload condition REV
036–
037–

Note that the motor circuit also uses the overload input, which will shut down the motor. The normally closed overload contacts are programmed as normally open in the logic driving the motor starter outputs. The forward and reverse motor commands will operate normally if no overload condition exists because the overload contacts will provide continuity.
However, if an overload occurs, the contacts in the PLC program will open and the motor circuit will turn OFF. The overload indicator pilot lights (OL Fault Fwd and OL Fault Rev) use latch/unlatch instructions to latch whether the overload occurred in the forward or reverse operation.
PLC implementation of the circuit in Figure 1
Figure 4 – PLC implementation of the circuit in Figure 1

Again, the latching occurs before the forward and reverse motor starter circuits, which will turn off due to the overload. An additional normally open acknowledge overload reset push button, which is connected to the input module, allows the operator to reset the overload indicators. Thus, the overload indicators will remain latched, even if the physical overloads cool off and return to their normally closed states, until the operator acknowledges the condition and resets it.
Figure 5 illustrates the motor wiring diagram of the forward/reverse motor circuit and the output connections from the PLC. Note that the auxiliary contacts M1 and M2 are not connected.
Forward/reverse motor wiring diagram
Figure 5 – Forward/reverse motor wiring diagram

In this wiring diagram, both the forward and reverse coils have their returns connected to L2 and not to the overload contacts. The overload contacts are connected to L1 on one side and to the PLC’s input module on the other (input 003). In the event of an overload, both motor starter output coils will be dropped from the circuit because the PLC’s output to both starters will be OFF.

Control circuit for forward and reverse motor (VIDEO)

Cant see this video? Click here to watch it on Youtube.
Reference: Resource: Introduction-to-PLC-Programming – www.globalautomation.info

4 Steps To Follow During Commissioning of a PLC System

PLC programs are never final…

Yes, PLC programs are never final, it is always possible to make corrections and subsequent adaptations to new system according the customer requirements. Even during commissioning,program changes are often necessary. The commissioning of a system can be divided into four steps:
  1. Checking the hardware
  2. Transferring and testing the software
  3. Optimisation of the software
  4. Commissioning of the entire system

1. Checking the hardware

Each sensor, switch and button is connected to a specific input and each actuator to an output. During engineering process addresses and wires must not be mixed up. Also, the sensors and actuator placing should be checked (that they are where they have to be in the automated system).
During checking procedure, the outputs are set in a test mode. The actuators must then meet the specified requirements (functions). If changes are made, then the documentation (allocation list, drawings, etc) must also be updated to respond to reality.
PLC hardware
PLC hardware (photo credit: BR Automation)

1.1 Testing inputs and outputs

Input devices, e.g. switches, can be manipulated to give the open and closed contact conditions and the corresponding LED on the input module observed. It should be illuminated when the input is closed and not illuminated when it is open.
Failure of an LED to illuminate could be because the input device is not correctly operating, there are incorrect wiring connections to the input module, the input device is not correctly powered or the LED or input module is defective. For output devices that can be safely started, push buttons might have been installed so that each output can be tested.

2. Transferring and testing of software

Prior to commissioning, all available off-line and virtual PLC program testing tools should be used intensively to find program faults. For example, such test tool is in STEP 7 as subprogram S7-PLCSIM. It simulates the work of a PLC (virtual PLC) and allows the user written PLC program to be tested.
Following this, the program is transferred to a central processing unit in the virtual PLC. The entire program is executed without using the real PLC.
The user has to simulate the input signal changes and verify how the outputs react to it. Some PLCs offer simulation in a real PLC: the entire program is executed in a PLC without the real inputs and outputs being connected. Processing of the PLC outputs thus only takes place in the PLC image table. The physical PLC I/Os are not updated to/from the PLC I/O images.
Therefore this eliminates the risk of damaging machines or system parts.
After this, the individual user program parts and system functions are tested: manual operation, setting, individual monitoring programs etc. and finally the interaction of the program parts with the help of the main program.
The system can and should be commissioned step-by-step. Important aspects of commissioning and fault detection are the test functions of the programming system, such as the single-step mode or the setting of stop points. The single-step mode in particular is of importance, whereby theprogram in the PLC memory is executed line-by-line or step-by-step. In this way, any program faults which may occur in the program can be immediately localized.

3. Optimisation of the software

User programs can almost always be improved after the first test run. It is important that any corrections or modifications are made not just in the PLC user program, but are also taken into account in the documentation.

4. Commissioning of the entire system

This already occurs in part during the testing and optimization phase. Once the final status of thePLC user program and the documentation is established, all the controller functions (in accordance with the automation task) need to be executed step-by-step again.
If no faults occur by the entire system commissioning, then the system is ready to be handed over to the customer.
PLC panel during commissioning
PLC panel during commissioning (photo credit: megawatts.com.sg)

Friday, May 22, 2015

Clock synchronization between a HMI operator panel and a SIMATIC PLC

Depending on the required time synchronization and the used SIMATIC controller, this application shows the right solution.
IntroductionIn order for components, such as, for example, HMI operator panels and SIMATIC controllers to work in a plant with identical time, one of the listed components has to be the timer for all other components.
  • The component acting as timer is called clock master.
  • The time receiving components are clock slaves.

TaskThere are several HMI operator panels in a plant that exchange data with a SIMATIC controller.
The following tasks are to be implemented:
  1. In the first job, a HMI operator panel is to be the timing component.
    (HMI operator panel → SIMATIC controller)
  2. In the second job, a SIMATIC controller is to be the timer component.
    (SIMATIC component → HMI operator panel)
Solution
WinCC TIA Portal offers various solutions for the task described. The solutions depend on the
SIMATIC controller used and the required clock synchronization.
The application shows the respective options of clock synchronization and their implementation in the program.
Possible clock synchronizations
  • HMI clock synchronization (master)
  • HMI clock synchronization (slave)
  • Area pointer: Date/Time
  • Area pointer: Date/Time PLC
  • Area pointer: Control job 14 and 15
For each clock synchronization an example project is stored. Pre-programmed function blocks reduce your configuration effort. 
The description is valid for the following SIMATIC controllers and
HMI operator panels.
  • SIMATIC controllers
    • SIMATIC S7-1200
    • SIMATIC S7-1500
    • SIMATIC S7-300
    • SIMATIC S7-400
  • HMI Operator devices
    • SIMATIC Basic Panels
    • SIMATIC Panel
    • SIMATIC Comfort Panel
    • SIMATIC Multi Panel
    • SIMATIC Mobile Panel
    • SIMATIC RT Advanced
Documentation und example projekt
  Documentation (2,4 MB)
 Registrierung notwendig  Example project for WinCC and STEP 7 V13 SP1 (36,1 MB)
 

Printing with SIMATIC Comfort Panels

Task
By means of a control panel, it should be possible to output data such as a screenshot, a shift report or a fault messages report via a printer or an alternative.
It should be possible to print, independent from the manufacturer and type of the printer.
Solution 
To offer a solution as generally applicable as possible for printing data, new printer drivers were developed for SIMATIC Comfort Panels.
The "optional package printer driver" contains the following printer drivers:
  • PDF print (print as a PDF file)
  • HTML print (print as an HTML file)
  • PostScript print (print via any postscript-compatible printer)
  • Brother QL-650TD (thermo printer).
The following figure gives a schematic overview of the most important components of the solution:

Advantages
The "optional package printer driver" offers the following advantages for you.
  • You can print either in PDF or HTML file format.
  • By means of an integrated PDF viewer or the Internet Explorer, the printouts can be displayed directly at the control panel.
  • The storage path for the PDF and HTML printer driver can be changed over the desktop from the Comfort Panel .
  • Printing the PDF or HTML file via any printer you like.
  • Thanks to the postscript driver you are independent from the type of printer and from the manufacturer of the printer.
Downloads
Contents of Downloads
Download
Documentation
The documentation describes all the required installation steps and settings in each printer driver.
58205602_Printer_Options_Package_DOKU_v12_en.pdf ( 918 KB )
Code
The zip file contains WinCC Comfort V11 project contained in STEP 7.
The configuration serves for simulating fault messages and for outputting the data via the installed printer drivers. However, the program is not mandatroy for implementing the application. Please have a look at the information in the documentation.
58205602_Printer_Options_Packet_CODE_V10.zip ( 4162 KB )
Code
The zip file contains a few examples of printed PDF and HTML files. Please have a look at the information in the documentation.
58205602_Printer_Options_Packet_SampleFiles_V10.zip ( 105 KB )
Additional information
Title Link
Printer for SIMATIC Panels and Multi Panels
(at this link, you will find the printer drivers for the Comfort Panels)
Entry ID: 11376409

Thursday, April 23, 2015

PLC Analog IO Troubleshooting Tips

When commissioning or troubleshooting PLC inputs and outputs (IO), the analog signals are often the most difficult.  First, analog IO almost always has to be scaled to convert the raw signal to useful process values.  Also, there are many wiring and external device (sensor/actuator) configurations.
Here are some simple guidelines for troubleshooting and working with Analog IO.  Although these guidelines are intended to help you think about the process of troubleshooting, this process will surely catch any specific issues you encounter.

Inside the PLC:
1. Ensure the IO channels are properly configured
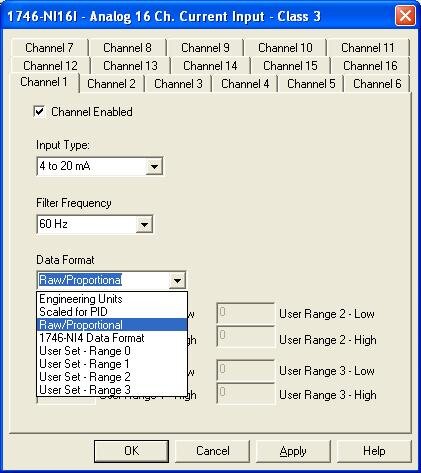
Most PLCs try to make it easy to configure analog IO hardware.  There are often selection boxes for the many signal types:  Voltage / current / resistance.   4 wire / 2 wire.  In the Allen Bradley RSLogix500 IO configuration at #3 below, for example, you can select an input type for each channel.
Double-check your analog IO channel settings and make sure they match the sensor or actuator wired to that channel.  As described in step 2 above, these may be configurable settings, or they may be fixed values.  Either way, they must match your PLC configuration.
2. Make sure the raw values are within range
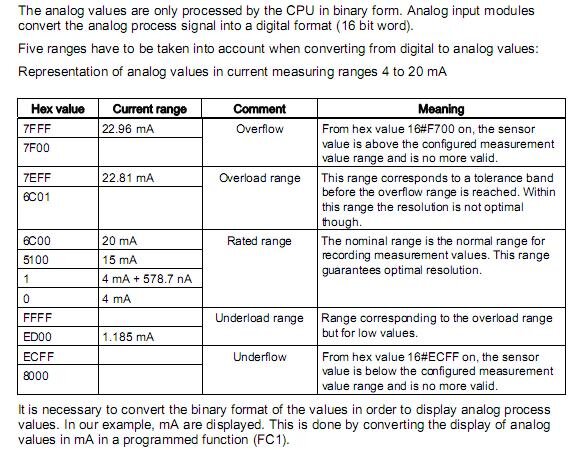
All analog IO modules have defined ranges for raw IO values.  For example, the Siemens SM331 analog module manual has the following range definitions listed for a 4-20mA input:
 
Most PLCs have a way to monitor the raw input values.  For the Siemens example above, if you see that the raw hex input value is outside the rated range, then there is a problem with the analog signal to the PLC, and thus the problem lies with the wiring or the sensor itself.

3. Check PLC scaling
Analog input and output scaling can occur both at the IO module configuration and inside the PLC logic program.  Check both locations to make sure the PLC value is not accidentally being scaled twice.  We generally recommend scaling within the PLC program instead of in the IO module configuration so the math is obvious and visible at one location.
In the Allen Bradley RSLogix500 IO configuration below, for example, you can select between the different data formats, which include automatic or user-defined scaling.

Outside the PLC:
1. Check all wiring connections
Ok, this may seem obvious, but it's still the best place to start.  Wiring mistakes are known to happen from time to time, especially on new systems.  Wires are also known to become loose after years of faithful servivce.
Consult manuals for both the analog IO module and analog device.  Most, if not all, will have installation wiring diagrams.  Many analog wiring mistakes are related to improper grounding, so watch for that specifically. 
2. Check sensor / actuator settings
Many analog devices such as sensors or actuators require configuration.  For example, an ultrisonic sensor has a "teach" mode that defines the conditions for the minimum 4mA and maximum 20mA signals (assuming it is a 4-20mA sensor).  Other devices, such as a temperature transmitter, may require you to configure it for voltage or current mode.
At the very least, you will need to confirm the scaling and range for any analog device so that the PLC and the device are "speaking the same language" so to speak.  These ranges and scales can be found in a manual or the device itself.
3. Measure the analog signal with a multimeter
If you've checked out the wiring and the settings and still have trouble with your analog device, pull out a multimeter and measure the actual voltage or current signal going to or from the device.  This will remove any ambiguity about what the signal "should" be and tell you exactly what it is an whether it's a device issue or a PLC issue.
#