When commissioning or troubleshooting PLC inputs and outputs (IO), the analog signals are often the most difficult. First, analog IO almost always has to be scaled to convert the raw signal to useful process values. Also, there are many wiring and external device (sensor/actuator) configurations.
Here are some simple guidelines for troubleshooting and working with Analog IO. Although these guidelines are intended to help you think about the process of troubleshooting, this process will surely catch any specific issues you encounter.
Inside the PLC:
1. Ensure the IO channels are properly configured
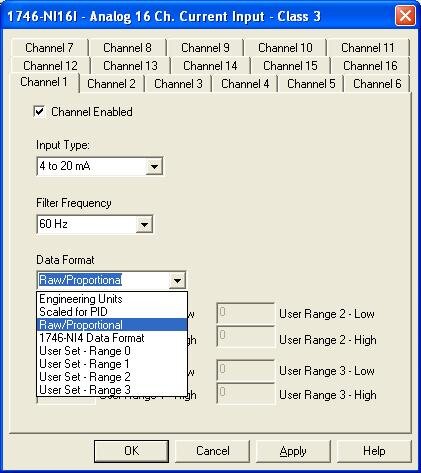
Most PLCs try to make it easy to configure analog IO hardware. There are often selection boxes for the many signal types: Voltage / current / resistance. 4 wire / 2 wire. In the Allen Bradley RSLogix500 IO configuration at #3 below, for example, you can select an input type for each channel.
Double-check your analog IO channel settings and make sure they match the sensor or actuator wired to that channel. As described in step 2 above, these may be configurable settings, or they may be fixed values. Either way, they must match your PLC configuration.
2. Make sure the raw values are within range
All analog IO modules have defined ranges for raw IO values. For example, the Siemens SM331 analog module manual has the following range definitions listed for a 4-20mA input:
Most PLCs have a way to monitor the raw input values. For the Siemens example above, if you see that the raw hex input value is outside the rated range, then there is a problem with the analog signal to the PLC, and thus the problem lies with the wiring or the sensor itself.
3. Check PLC scaling
3. Check PLC scaling
Analog input and output scaling can occur both at the IO module configuration and inside the PLC logic program. Check both locations to make sure the PLC value is not accidentally being scaled twice. We generally recommend scaling within the PLC program instead of in the IO module configuration so the math is obvious and visible at one location.
In the Allen Bradley RSLogix500 IO configuration below, for example, you can select between the different data formats, which include automatic or user-defined scaling.

Outside the PLC:
1. Check all wiring connections
Ok, this may seem obvious, but it's still the best place to start. Wiring mistakes are known to happen from time to time, especially on new systems. Wires are also known to become loose after years of faithful servivce.
Consult manuals for both the analog IO module and analog device. Most, if not all, will have installation wiring diagrams. Many analog wiring mistakes are related to improper grounding, so watch for that specifically.
2. Check sensor / actuator settings
Many analog devices such as sensors or actuators require configuration. For example, an ultrisonic sensor has a "teach" mode that defines the conditions for the minimum 4mA and maximum 20mA signals (assuming it is a 4-20mA sensor). Other devices, such as a temperature transmitter, may require you to configure it for voltage or current mode.
At the very least, you will need to confirm the scaling and range for any analog device so that the PLC and the device are "speaking the same language" so to speak. These ranges and scales can be found in a manual or the device itself.
3. Measure the analog signal with a multimeter
If you've checked out the wiring and the settings and still have trouble with your analog device, pull out a multimeter and measure the actual voltage or current signal going to or from the device. This will remove any ambiguity about what the signal "should" be and tell you exactly what it is an whether it's a device issue or a PLC issue.


0 Comments:
Post a Comment